
If you’ve had a chance to use the new BusinessObjects XI 3.0, one of the first things you will notice is that all your services are now managed by a local process called a Server Intelligence Agent. This agent is responsible for starting and stopping all the services that it manages.
After installing BusinessObjects XI 3.0, the first thing I did was start the CCM (Central Configuration Manager). I noticed I only had two services running.
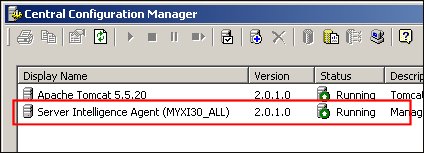
Where are my services?
They are now managed based on how the Server Intelligence Agent. I don’t want to get into the details of what the Service Intelligent Agent does. This is clearly explained in the documentation. Instead I would like recommend to you a new best practice with the SIA.
But the CMS is King right?
In the XI 3.0 system there is a bit of a catch 22. The CMS is still king. Nothing works without the CMS. When the SIA starts up, it checks to see if it has a local CMS or not. If it does, it will start the CMS. After the CMS has started, it will then read the list of servers from the CMS database that it manages. Finally, it will start all those services. If there is no local CMS for a SIA, the SIA will wait for a remote CMS to start so it can read it’s list of managed services from the CMS and start them up.
But what if the CMS won’t start? What if I only want to start the CMS?
We need to manage this potential occurence.
Recommended Best Practice
Create a new NODE with a CMS to be used for maintenance only.
I strongly recommend that you create a second NODE for each server which will have a local CMS. There may be a situation when you want to bring the system up in maintenance mode and do some work without all the other services starting.
This also gives you the opportunity to start another CMS should you have a problem with your primary CMS. Here are the steps for creating a new NODE with only a CMS.
From within the CCM choose the Add Service Intelligence Agent from the menu. ![]() The SIA, like the CMS, needs a specific port to be assigned to it. It cannot pick a random available port. For the name, use the same name as your primary NODE but add the “_MAINT” to the end. Next pick an available port. In my case I used 6501.
The SIA, like the CMS, needs a specific port to be assigned to it. It cannot pick a random available port. For the name, use the same name as your primary NODE but add the “_MAINT” to the end. Next pick an available port. In my case I used 6501.
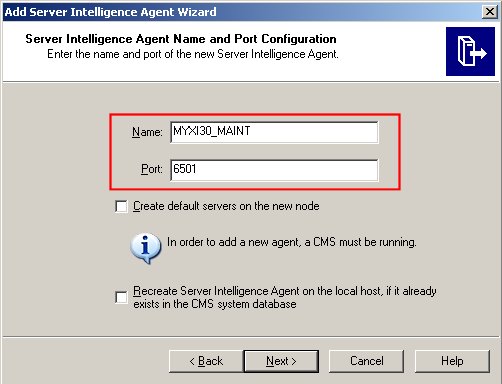
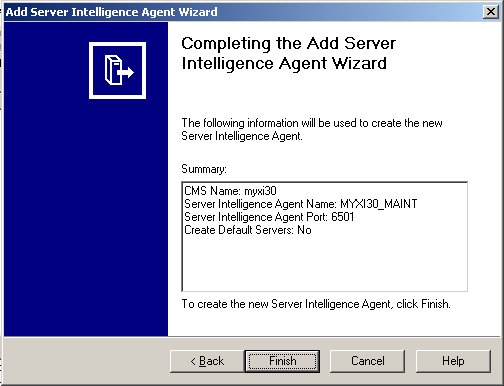
Choose Next and fill out the CMS login information so that the configuration information for your new NODE can be written to the CMS database and choose Finish.
Although services can be added from the web based Central Management Console (CMC) interface, let’s start the SIA now. If you look at the properties of this SIA, you will see that it is associated with a remote CMS. We want to add a new “local” CMS to this SIA. (This means the SIA will have it’s own CMS to manage).
Go to the web based CMC and navigate to the Servers screen and see the new NODE we just created. Now we are going to add a new CMS server.
There are a number of ways to add a new server. Here I have highlighted three.
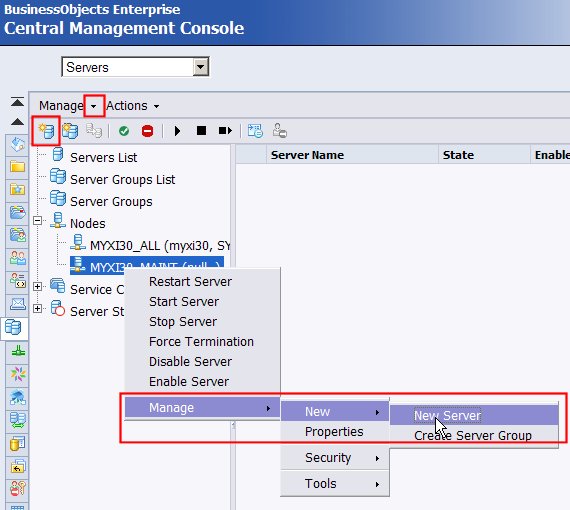
You can select the new NODE and choose the icon, drop-down menu or the new right-click menu. I love this new Web 2.0 that makes the interface work like a traditional windows environment. It provides a huge productivity gain.
Next, you are prompted to choose the server to add. We want to choose Core Services and Central Management Services. Next you will have an opportunity to add optional, additional services. The CMS supports an additional single sign-on service. I recommend you add that as well.
Now you need to tell which NODE to associate this service too. We want to chose our new _MAINT NODE.
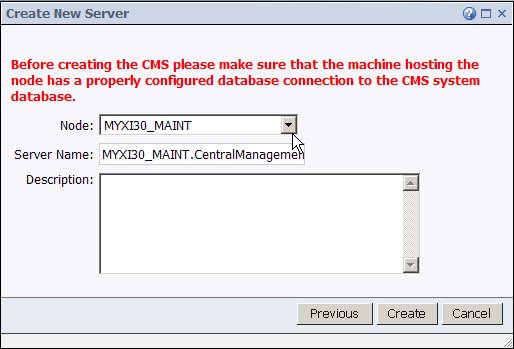
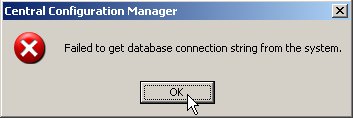
The message is warning us that without the correct database configuration and setup, the CMS will not start. In our case, we have never set up a CMS on this NODE, so this is a warning we should heed. We will not be able to successfully start the CMS without additional setup.
Choose Create.
Unfortunately when setting up this service we don’t get a chance to change our final settings before the service is created, so after we create the service, we need to got back into the properties of the service and adjust two important settings.
Open up the properties of the new CMS and modify the listening port and the automatic start-up settings. The default port for the CMS is 6400, however my default CMS might already be running on this port, to temporarily change this to port 6401 – ONLY for testing. I will change it back to 6400 as soon as testing is complete.
NOTE: if you are ONLY going to use this SIA when the other SIA has been stopped, then you may use 6400 but understand that when you attempt to start this CMS, if another CMS is already running on port 6400, then this CMS will not be able to start. If you will want to use two CMSes at the same time, then you will need to use two different ports.
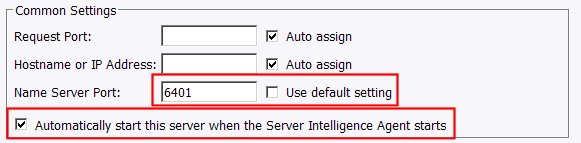
In addition, make sure and automatically start this server when the Server Intelligence Agent starts. Remember, when I manually start my new SIA, (MYXI30_MAINT) I will need a CMS to start as well.
Configuring the Database Connection for the CMS
Now there are TWO WAYS to properly configure the database connection. The fast and automatic way or the slow and manual way.
Option 1 – Fast and Automatic
The fastest way to setup the connection information for your CMS is to find an existing .dbinfo file for a working CMS and NODE combination and copy the file and rename it to the name of your new CMS.
In our case, the name of my working NODE with an associated CMS was MYXI30_ALL so the name of the associated .dbinfo file was found under: C:Program FilesBusinessObjects 12.0win32_x86 and is called _boe_MYXI30_ALL.dbinfo.
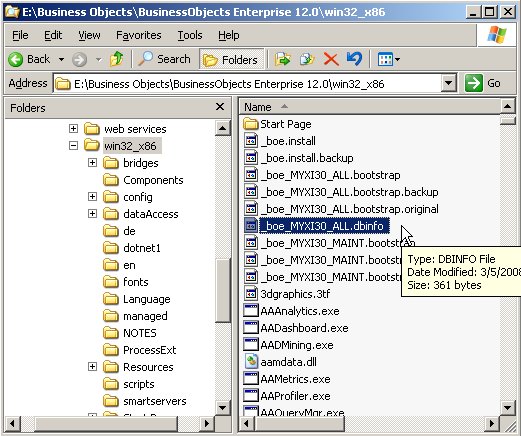
Copy this file and rename the file to the name of your new NODE with the _MAINT. In my case the node will be called _boe_MYXI30_MAINT.dbinfo.
Now when you start the CMS it will have the data necessary to connect to the CMS. Next time your new NODE starts, so will this CMS.
Option 2 – Slow and Manual (and ultimately the “right” way)
In order to manually configure the connection information for the CMS so that it will know how to connect to the CMS, you need to use the CCM. The CCM is the only tool that will allow you to configure the connection information. This cannot be done from within the CMC. From the CCM on the server, make sure the new SIA is NOT running.
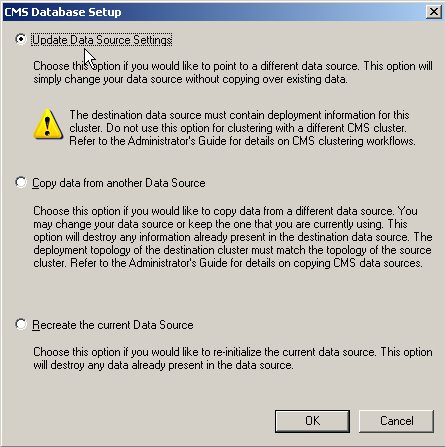
Next, choose the Specify CMS Database icon so that we can define the CMS connection information for our new NODE.

You may receive an error message. This is normal.
Just choose OK to continue. Eventually you will get the prompt to configure the connection for the CMS database. We do NOT want to create or recreate our CMS, we simply want to update the data sourse settings, so choose the first option and choose OK.
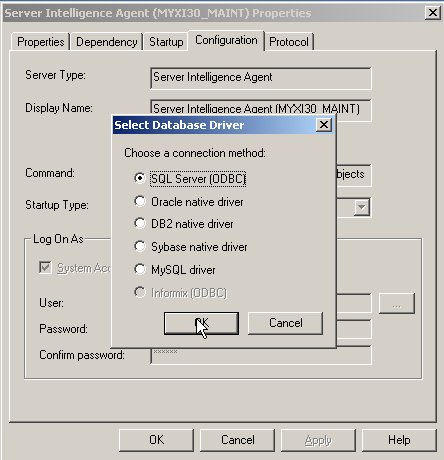
You will be prompted to choose the associated database driver for your CMS and to enter the credentials.
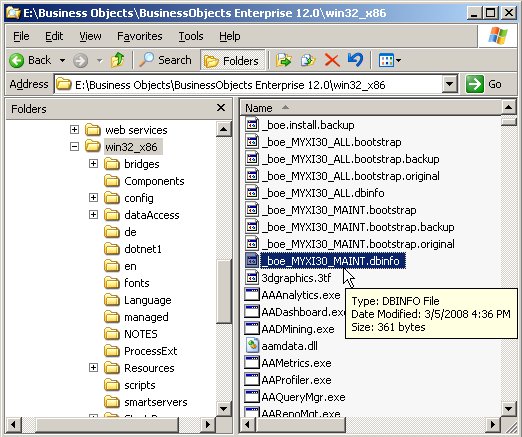
Once this as been completed, a .new file will be created in the C:Program FilesBusinessObjects 12.0win32_x86. The file will be called _boe_NODENAME.dbinfo. In my case it is called _boe_MYXI30_MAINT.dbinfo.
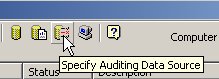
If you are using an auditing database you may also wish to configure this by choosing the auditing configuration and following similar steps for that database.
When you are finished start the SIA and the CMS will start as well.
Conclusion
Remember, if the CMS does not start automatically, check the settings in the CMC for the service and make sure that the new CMS service is configured to start automatically when the SIA starts. This is a parameter that can be set for each service.
![]()
Hopefully this has been helpful in explaining some of the new best practices around XI 3.0 Administration. In addition I hope this will give you a quick introduction to the SIA and it’s relationship to the CMS. Your new “CMS-only” node will be great when you need to just bring up the CMS so you can access the CMC.
Enjoy.
Geoff Asked Me:
Hi, I found the SIA info very useful and have set up two cms accessed by different ports.
You mentioaned adding the additional SSO service, how do you amend the settings to achieve SSO?
Thanks Geoff for your comments. In some cases, when it comes to setting up SSO, specifically with SAP and using SAP’s SNC, part of the process includes creating a server-side trust relationship between SAP and BusinessObjects.
Server-side Trust: In order for a party to impersonate an SAP user without providing a password, that party must have identified itself with SAP using a method stronger than a regular username and password. I.e. an SAP user with the SAP_ALL authorization profile cannot impersonate another SAP user without knowing that user’s password. Instead, this party must run under credentials that are authenticated using a registered Secure Network [SNC] provider, and these credentials are explicitly configured inside SAP to be allowed to impersonate without a password. In the case with BOE, relevant servers such as the WebI processing server and the Crystal Reports Job server must run under credentials for which this setup has been made.
In the process of setting up this trust, you will define a number of BOE services to run under a specific set of user credentials. These services include the AdaptiveJobServer, AdaptiveProcessingServer, DestinationJobServer, PublicationJobServer, CRJobServer and WebIJobServer.
For more information about configuring SSO with SAP search for: SAP Server Side Trust with Business Objects XI 3.0. Documentation regarding the configuration of SSO with other authentication systems is also available.
Hi David, I was hoping that the additional SSO would allow the standard java login page to be bypassed in some way. We want the network user name / password to be used to provide access to Infoview when using Windows AD as the default authentication. Is there a way to achieve this?
I typically refer to that as “silent” sign-on. Single sign-on clearly can have different meanings. For some people it means I have a single password. For others, it means my Windows authentication (against Active Directory) is passed through to my application. We can support silent-sign-on if you are running your BusinessObjects infrastructure on Windows with Windows software. I will add this to my “future postings” list.
Are you running everything on windows and using windows infrastructure components. Do you want to security to be passed down to the database? That adds one additional level of complexity. 🙂
Windows based silent-sign-on to XI 3.0 Infoview home page http://server:8080/infoviewapp
would be sufficient for me.
PS. we do not have siteminder
An email would be great, cheers
Any way I could get an email on the step by step process for enabling “Silent Sign-On” as well? I am tryign to follow the XI 3.0 admin guide, but it seems to only have the option when using a separate 3rd party tool such as Siteminder or Vintela to do this.
Any help is much appreciated!
It depends on the application server, browser, o/s, etc. of your environment. If you are using a Java Application server with IE browsers, then Vintela is your only option. If you are using an all Microsoft Stack, e.g. IE, .NET, .NET InfoView, etc. then all you need is Kerberos.
Hi Dave,
have just setup another SIA today on same test server as original installation as I need to test LCM. Did the default server option as I needed the FRS’s. Have repointed them in the new CMS to a new FileStore folder I have created in the install dir. The FRS services are both showing as running, but disabled and will not enable. Any ideas would be grateful as the bo documentation is somewhat lacking.
Thanks,
gridgway
I think you may need to revisit the documentation. If you create another CMS as part of the same machine and you point it to the same repository database, these CMS’s will be clustered… in which case you would not be able to test LCM.
You CANNOT have more than one unique instance/cluster name of an SAP BusinessObjects on a single server when running Windows.